In today’s post, we are covering how to remove write protection from memory cards or pen drives. The write protection does not allow a user to copy or transfer any of the files stored in memory cards to the device. It also prevents files from deletion and formatting. When your memory card is refusing to be formatted and windows inform you with write protected error, the memory card is write-protected. Don’t worry! Here we discuss useful and simple ways to remove write protection on an SD card. Just a couple of minutes and the write protection from SD card will be removed and you’ll be able to use it in the way you desire.
Method 1:
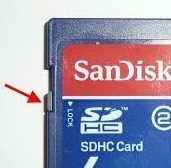
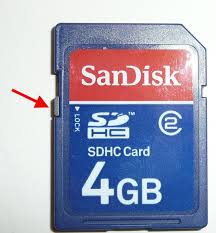
The simplest way is to check whether the pendrive or micro SD card has a lock present on it. The lock switch may be a tiny white or silver tab on the left side of the SD card. As shown in the image, the lock is present on the side pane and it can lock the data. When it is on, you will get the write-protection error on connecting it to your device.
So, Just slide the lock all the way up and the write-protection will be removed.
Method 2:
Check the System Registry
1) Go to Run and type regedit.
2) Now, registry editor will be opened. Navigate to HKEY_LOCAL_MACHINE–>system–>currentcontrolset–>control–>storagedevicepolicies
3) You will see write protection option. Double-click on it and set its value to 0.
4) You can now check for write protection and it will be removed.
Method 3:
Formatting SD card
1) Insert the SD card into your computer using SD card reader.
2) Right-click on Computer and select Manage.
3) The computer management window will appear. Now click on Disk Management below Storage.
4) Here, you will see all the storage devices. Right-click on the storage device you want to format and select Format.
5) Click ok and your computer will format the SD card, removing write-protection status.
Method 4:
Using Diskpart Utility
1) Open Command Prompt and type diskpart and hit enter
2) Now, type listdisk and press enter.

3) Select the appropriate drive and again hit enter.
4) Now, type attributes disk clear readonly and press enter. This command is used to remove write protection status.
5) Type exit.
6) Now, go to your drive and format it by right-clicking it and the write-protection will be removed.
Wrapping Up
I hope that this information helps you in removing write protection and getting access to your device data. If you have any queries or suggestions, please feel free to share them with us in the comments!
If you like our content, please consider sharing, leaving a comment or subscribing to our RSS feed to have future posts delivered to your feed reader.
Please follow us on twitter @CodeRewind and like us on facebook